


Avalanche Awareness Scotland: A Beginner Climber's Guide
Here's the thing nobody tells you when you first pick up an ice axe: the snow that makes Scotland's winter so good is the same snow that can bury you. Beginners head onto Ben Nevis and Skye with shiny new axes and a head full of ice-climbing hype, and avalanche awareness for beginner winter climbers in Scotland gets pushed to the back of the queue. That's the wrong order. You don't need to be a ski tourer to need this stuff. If you're swinging into a gully with snow piled above you, you're in avalanche terrain, whether you like it or not. This guide covers what we actually work through on the hill, without the jargon.
Table of Contents
Quick Takeaways
Key Insight | Explanation |
|---|---|
Steep isn't the only warning sign | Most avalanches release on steep slopes, roughly 30 degrees and up, but lower-angle snow can still slide, especially when wind has loaded it. |
Read the forecast twice | Check the Scottish avalanche forecast the night before and again at the car park, because snow here can change overnight. |
Look at the runout first | Work out where the snow would stop if the slope above let go. If that spot is where you're standing, move. |
Ice routes aren't automatically safe | Gullies funnel snow and debris, so the line you're climbing may be the exact path of a slide. |
Kit only works if you've practised | A transceiver, probe and shovel won't help if you've never run a search under time pressure. |
Set your turnaround time before you leave | Deciding to go back early is a skill. Agree the point in advance so you're not making the call while you're tired and keen. |
Why Scotland's Snow Is Different
Scotland's winter snow is a bit of a rollercoaster. One week it's deep and soft, the next it's been rained on, frozen and thawed into a crust you could almost skate on. That constant swapping makes it harder to read than the cold, dry snowpack people picture when they hear the word avalanche. For beginners, the big lesson is simple: the snow changes fast, so yesterday's conditions don't tell you much about today.

Rain on Snow and Hard Frost
Rain falling on a snowpack is one of the sneakiest weak spots we see. Water soaks in, the layers bond badly, and a slope that felt solid in the morning can let go by afternoon. Then a hard frost locks everything in place, which can make a slope look stable while it's still hiding a weak layer underneath.
In practice, this means you look at what happened in the last 48 hours, not just what the sky looks like. If it's rained up high, or the temperature has swung hard, treat the snow with suspicion. Look for clues on the walk in, like snow balling up on your boots or a crust that breaks up under every step.
The Wind Does the Heavy Lifting
Wind is the other big player. It picks up snow from exposed ridges and dumps it on the lee side, where it builds into slabs that can sit on top of a weaker layer. Those wind-loaded pockets often look smooth and innocent, which is exactly why they catch people out. A slope with a neat, rounded surface can be far more dangerous than a steep, rough one.
Why Beginners Get Caught Out
Most beginners make the same mistake. They assume that because they're on a climbing route, not a ski slope, the snow isn't really the issue. Honestly, that's backwards. The climbing line is often exactly where snow collects, because gullies and bowls are natural snow traps. If the snow's there, the risk is there too.
Understanding Avalanche Terrain
You don't need to be an avalanche expert to start learning terrain. You need to know which slopes deserve your attention and which ones you can mostly ignore. Once you start looking at the hill that way, you'll be surprised how often the dangerous bits jump out at you.
The Steepness Trap
Most avalanches release on slopes in the steep range, roughly 30 degrees and up. That's steeper than most people guess, especially when you're looking up at a gully from the bottom and it seems more like a wall than a slope. A basic inclinometer app on your phone gives you a rough angle, and for a beginner that's usually good enough to spot trouble.
Here's the catch. Angle alone doesn't tell the whole story. Gentler slopes can still slide, particularly when wind has loaded them or they sit above a steeper section. Think of steepness as a warning light, not a permission slip.
Start Zones, Tracks and Runouts
Good terrain reading means looking at three things. First, where a slide could start, usually at a convex roll, under a cornice or in a wind-loaded bowl. Second, the track, which is the path the snow would take down. Third, the runout, the flat ground where it would finally stop. Plenty of beginners only look at the start and forget that the runout is where the debris piles up, sometimes right on top of people.
Pro tip: Before you commit to a line, stand at the bottom and ask where the snow would go if the top let go. If the honest answer is "right where I'm standing," move somewhere else before you start.
The slope that looks harmless is often the one that's loaded. Judge the terrain above you, not just the bit under your feet.
Be careful near cornices too. These overhanging lips of snow form on the lee side of ridges and can break off with little warning. Keep back from the edge when you're near the top of a route, and don't wander along a snowy ridge just because the view is good.
Reading the Forecast Before You Go
The forecast is the most useful thing you'll read all day, and it's free. The problem is that most beginners either skip it or read it like a weather app, checking whether it's going to be sunny. Avalanche forecasts are different. They tell you how likely a slide is, where it's most likely, and roughly at what height. Learn to read that and you've got a serious head start.
What the Danger Rating Actually Means
Forecasts use a numbered danger rating, running from low up to extreme, and each level comes with a description of the snow and where it's worst. Don't just memorise the number. Read the words underneath, which tell you whether the problem is fresh snow, wind slab or an old weak layer. A "moderate" with a note about wind-loaded slopes on one side of the hill is a very different day from a "moderate" with no detail at all.
Matching the Forecast to Your Hill
The forecast is a regional picture, not a guarantee for your exact slope. Use it to set your plan, then check the snow with your own eyes. Look at the surface, feel for hard slabs underfoot, and listen for hollow sounds. If your route climbs into the height band the forecast warns about, you're in the zone it's describing, even if the valley looks calm.
Check it again on the morning. Conditions can shift overnight, and a forecast read the evening before can already be out of date by the time you're pulling on your boots in Fort William.
Reading the Weather Alongside It
Wind speed and direction, temperature and recent precipitation matter as much as the rating. A sharp rise in temperature, a gale blowing snow off the tops or a spell of rain all change the picture fast. Write down what you've seen over the last two days and compare it with the forecast before you commit.
Ice Climbing Under Avalanche Risk
Ice climbing feels like a different world from ski touring, but the snow doesn't care what you're doing. Many classic ice lines sit in gullies and under snowy slopes, which means you're often climbing directly in the path of anything that comes down. Ice is also very unforgiving if something lands on your helmet.

Gullies Are Snow Traps
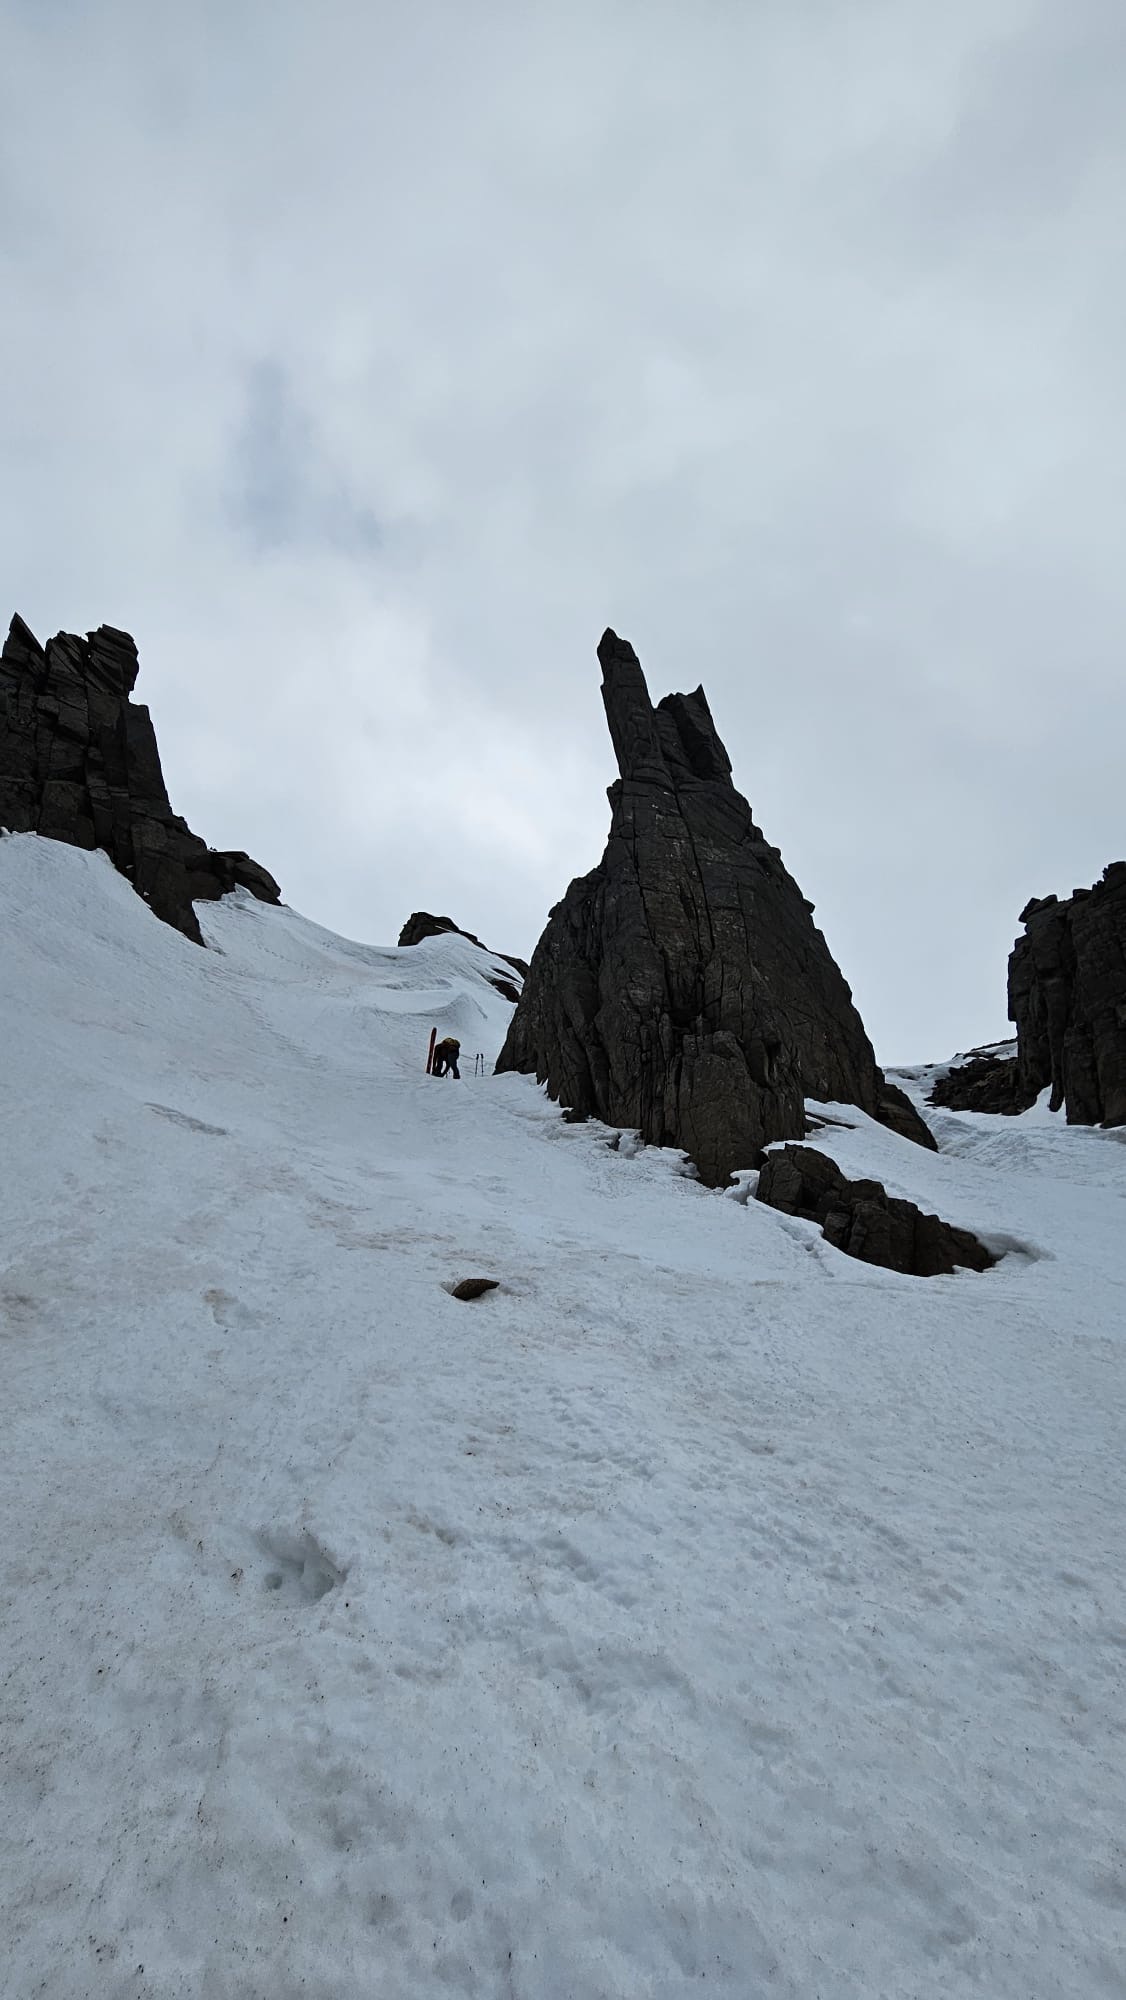
A gully is basically a funnel. Snow blows into it from both sides, collects in the bottom and can release from the walls above. When a slide comes down a gully, the debris ends up exactly where you are. A common mistake is treating the bottom of the gully as the safe spot because it looks sheltered. Sheltered and safe are not the same thing.
If you're planning a line, look at the slopes above it before you start, not halfway up. If you spot fresh snow, a recent slide or cracking on the surface, pick a different route or go another day. There's plenty of good ice still there next week.
Cornices and Fragile Edges
Cornices are the other problem. They form on ridges above ice routes and can break off onto the climb below. Sometimes they fall on their own as the weather warms. Sometimes movement from a rope team sets them off. Give them room, and don't belay directly under a cornice line, however tempting the shelter looks.
Where possible, pick ice lines where you can see the top of the route and the approach clearly. If you can't tell what's hanging above you, that's your answer. Not knowing is a good reason to walk away.
Carrying the Right Kit
Here's the honest version. Kit doesn't stop avalanches. It helps you find someone if the worst happens, and that's a very different job. The three core items are a transceiver, a probe and a shovel, and they only work if you know how to use them under stress.
The Big Three: Transceiver, Probe and Shovel
A transceiver sends and receives a signal so a partner can locate a buried person. A probe is a long, collapsible pole that pinpoints someone under the snow. A shovel gets them out, and speed matters enormously here. Carry all three when you're in avalanche terrain, and make sure everyone in the group has the same kit.
Check batteries before you leave and wear the transceiver where it stays put, usually close to the body under a layer rather than in a rucksack that might come off in a fall. Know how your model works before the day, too. Fumbling with an unfamiliar transceiver during a real search wastes time you don't have.
Choosing a Shovel That Suits Climbing
Plenty of climbers end up with a shovel they picked for ski touring, which can be heavy and awkward on a steep route. A lightweight shovel with a low-profile blade is often a better match. It packs small, doesn't snag on your rope and still digs well enough. Test it on the snow before it matters, and make sure the handle locks firmly.
Do Winter Climbers Really Need It?
Winter climbers argue about this on forums all the time, and I get why. Carrying a transceiver on a short ice route can feel like overkill. My view is simple. If your route sits in avalanche terrain, carry it. The moment you decide you don't need it is usually the moment you're wrong.
Pro tip: Practise a transceiver search in a field with a partner before your first real trip. Bury a couple of signals, time yourself, then go again. Speed is what saves people, and you only get it from repetition.
Making Calls on the Day
You can know all the theory and still make a bad call on the hill. Decisions get made when you're cold, tired and keen to climb the thing you've been staring at all week. That's when the plan you made at the car park starts getting bent.
Set Your Turnaround Time and Bail Points
Before you leave, agree a turnaround time and a couple of points where you'll bail if conditions look wrong. Write them down if you have to. A turnaround time stops you pushing on because you're already halfway up and it feels like a waste to go back. Turning around early is one of the most useful skills in winter climbing, not a sign you're weak.
Group Dynamics and Who Says No
Groups go wrong when one person has a bad feeling and nobody wants to say it out loud. Set a rule before you start: anyone can call a halt, and nobody gets teased for it. The person who says "I don't like this" is often the one reading the hill best. Make it easy for them to speak up.
Warning Signs You Shouldn't Ignore
Watch for recent avalanches, cracking that runs out from your feet and a hollow "whumpf" when the snow settles under you. Any of those means the snow is telling you it's unstable. Shooting cracks and fresh slides are the clearest signs, and they should send you back, not onward to see what happens.
Keep watching as you go. Conditions change through the day, and a slope that felt fine at nine in the morning can be a different beast by early afternoon, once the sun has been on it for hours.
Learning Avalanche Skills the Right Way
Reading this guide is a start, but reading won't teach you how to dig a buried partner out at speed. You need hands-on practice in real snow, with real kit, under a bit of pressure. The good news is there are several ways to get that, and they suit different people.
Comparing Your Options
Here's how the main routes stack up for a beginner. Pick the one that matches how often you plan to go into avalanche terrain and how much hands-on time you need.
Route | Best for | Watch out for |
|---|---|---|
Dedicated avalanche awareness course | Anyone who plans to go into avalanche terrain regularly | Places fill fast, and it's a bigger commitment of time and money |
Winter skills or intro course with a guide | Beginners who want hands-on time on the snow and the ice | Ask how much avalanche content is included, since it varies from course to course |
Self-study with forecasts and reading | Refreshing knowledge between trips and courses | No practice digging, probing or searching, which is where most people fall down |
Formal Avalanche Awareness Courses
A dedicated avalanche course is the most complete option. These usually run over several days and cover snowpack, terrain, forecasts, rescue skills and decision-making in one package. Some Level 1 style courses in Scotland run to around 18 hours of taught time, which gives a solid base. Book early, because the good ones fill up quickly each winter.

Winter Skills Courses and Intro to Winter Climbing
If you're brand new to winter climbing, an Intro to Winter Climbing course or one of our winter skills courses is a good place to start. You learn movement, axe and crampon technique, and how to read snow on the hill while you're doing it. Snow and terrain sit in the middle of the day, not as a separate lecture. Ask your guide how much time they'll spend on avalanche topics, because that changes depending on the day and the group.
Ben Nevis Winter Skills and Guided Days
Ben Nevis winter skills days and guided winter climbing trips give you a chance to see the decisions play out for real, with a guide making the big calls alongside you. Watch what they do: where they stop, how they check the slope, what they say when conditions don't match the plan. Those habits are worth more than any single fact in this article.
Whatever route you choose, ask questions. Ask why the guide picked one line over another and what they'd look for on a different day. The answers will teach you more than any checklist.
Frequently Asked Questions
Do I need an avalanche course before my first winter climb in Scotland?
Not strictly, but if you're heading into avalanche terrain, you should have at least basic training before you go without a trained partner or guide. A course gives you the terrain reading, forecast skills and rescue practice that reading alone can't. Until you've done one, stick to routes with low avalanche hazard and go with someone who knows what they're doing.
Is ice climbing on Ben Nevis safe from avalanches?
No route is automatically safe. Ice lines can sit under snowy slopes, in gullies that funnel snow or below cornices, so the risk depends on the day and the line. Check the forecast, look at the slopes above before you start, and be willing to pick a different route.
What's the minimum avalanche kit for a beginner?
A transceiver, probe and shovel are the core items, and everyone in the group needs them. Carry them whenever you're in avalanche terrain, and practise using them before you need them. A helmet and a firm plan for turning around matter just as much.
How do I read the Scottish avalanche forecast?
Start with the danger rating, then read the detail underneath. Look for the problem type, such as wind slab or a weak layer, and the heights and slope directions it mentions. Then compare it with the weather you've actually seen, not just what was predicted.
Can I learn avalanche skills on a guided winter day?
You can pick up a lot, especially decision-making and how a guide reads the snow. For a deeper understanding of snowpack and rescue skills, a dedicated course is a better fit. Ask your guide in advance how much time they'll spend on avalanche topics.
What's the biggest mistake beginners make?
Pushing on when the snow is telling them to stop. Most beginners know the rules but ignore them when they're close to the top or the route looks good. Set a turnaround time before you leave and stick to it.
Have you had a snow moment on a Scottish winter route that changed how you approach the hill? I'd love to hear about it, so drop your experience or your question in the comments below.

Comments